mozgi
GPT Image 2.0
在 GPT Image 2.0 中設計像揉皺紙球一樣的未來派 Crumple 椅的藍圖和圖表項目
提示詞
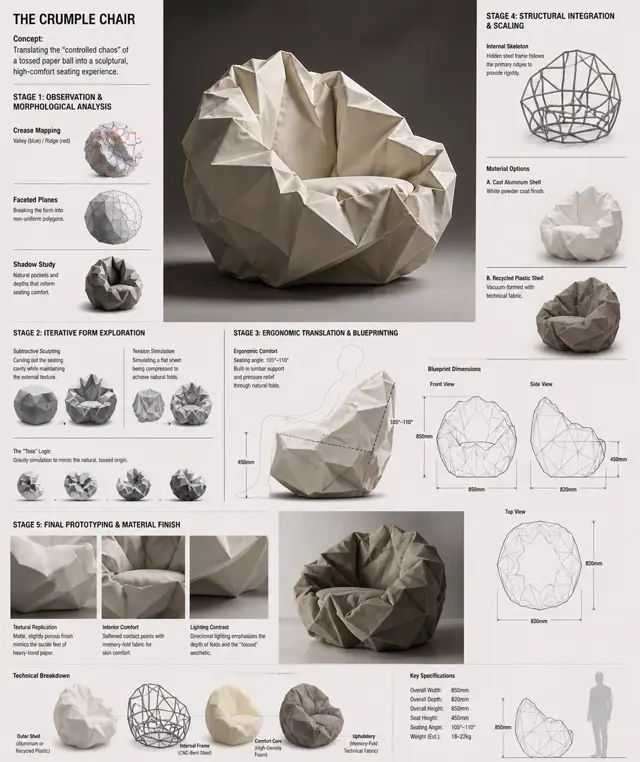
設計概念:皺褶椅
核心理念:將拋擲紙團的「受控混亂」轉化為兼具雕塑感與高度舒適性的座椅體驗。

階段 1:觀察與形態分析
目標是將皺褶紙張的影像拆解為可運用的幾何資料。
摺痕映射:辨識主要的「谷線」與「脊線」。這些線條代表椅子的潛在結構肋條或接縫。
多面平面:將球體拆解為一系列不規則多邊形。紙張的每個平面都可成為椅面軟墊或外殼的潛在面板。
陰影研究:分析「拋擲」形態如何形成深邃的凹陷。這些自然形成的凹槽可引導使用者重量被承托的位置。

階段 2:反覆進行形態探索
透過「數位揉皺」從球體轉化為座椅。
減法雕塑:將紙團想像成實心體塊。使用布林運算「挖出」符合人體形態的座椅凹腔,同時保留外部鋸齒狀的質感。
張力模擬:使用 3D 軟體(如 Rhino 或 Blender)模擬平面材料被壓縮的狀態。如此可確保摺痕看起來真實,而不是「建模」出來的。
「拋擲」邏輯:嘗試以重力為基礎的模擬,讓數位網格落下並觀察它如何自然沉降,模仿其「拋擲」而來的起源。

階段 3:人體工學轉化與藍圖繪製
將原始美學細化為具備功能的物件。
舒適核心:在皺褶形態上套用標準人體工學範本(座椅角度:105°–110°)。調整內部「摺痕」,以提供腰部支撐並減輕壓力。
藍圖生成:建立技術正投影圖(正面、側面、頂面)。標示尺寸:
座椅高度:450mm
總寬度:850mm
表面平滑處理:維持外部外殼銳利的「紙張邊緣」,同時柔化內部接觸點,提升肌膚接觸時的舒適度。

階段 4:結構整合與比例調整
讓概念在實體上具備可行性。
骨架:設計隱藏式內部框架(可能採用 CNC 彎折鋼棒或 3D 列印格構),沿著紙張摺痕最突出的脊線延伸,以提供剛性。
材質選擇: * 選項 A(高階):表面施以白色粉體塗裝的多面鑄鋁。選項 B(柔軟):以能保留皺褶外觀的「memory-fold」技術布料包覆真空成型的再生塑膠外殼。

階段 5:最終原型製作與材質表面處理
材質紋理複製:在材質上施加霧面、略帶孔隙的表面處理,模仿厚磅紙張的觸感。
光線對比:在最終渲染中使用定向攝影棚燈光,強調「拋擲」形成的陰影,讓椅子看起來像一大塊被丟棄的靈感。
設計提示:若要維持真實的「拋擲」外觀,請避免對稱。
Design Concept: The Crumple Chair Core Philosophy: Translating the "controlled chaos" of a tossed paper ball into a sculptural, high-comfort seating experience.\n\nStage 1: Observation & Morphological Analysis The goal is to deconstruct the image of the crumpled paper into usable geometric data. Crease Mapping: Identify the primary "valley" and "ridge" lines. These represent potential structural ribs or seams in the chair. Faceted Planes: Break down the sphere into a series of non-uniform polygons. Each flat surface of the paper becomes a potential panel for the chair’s upholstery or shell. Shadow Study: Analyze how the "tossed" form creates deep recesses. These natural pockets guide where the user’s weight will be cradled. \n\nStage 2: Iterative Form Exploration Moving from a sphere to a seat through "Digital Crumpling." Subtractive Sculpting: Imagine the paper ball as a solid mass. Use Boolean operations to "carve out" a seating cavity that fits the human form while maintaining the external jagged texture. Tension Simulation: Use 3D software (like Rhino or Blender) to simulate a flat sheet of material being compressed. This ensures the folds look authentic and not "modeled." The "Toss" Logic: Experiment with gravity-based simulation dropping a digital mesh to see how it settles naturally, mimicking the "tossed" origin. \n\nStage 3: Ergonomic Translation & Blueprinting Refining the raw aesthetic into a functional object. The Comfort Core: Overlay a standard ergonomic template (Seating Angle: 105°–110°) over the crumpled form. Adjust the internal "folds" to provide lumbar support and pressure relief. Blueprint Generation: Create technical orthographic views (Front, Side, Top). Map out the dimensions: Seat Height: 450mm Total Width: 850mm Surface Smoothing: Maintain the sharp "paper edges" on the exterior shell while softening the interior contact points for skin comfort. \n\nStage 4: Structural Integration & Scaling Making the concept physically viable. The Skeleton: Design a hidden internal frame (likely CNC-bent steel rods or a 3D-printed lattice) that follows the most prominent ridges of the paper folds to provide rigidity. Material Selection: * Option A (High-End): Faceted, cast aluminum with a white powder coat. Option B (Soft): Vacuum-formed recycled plastic shell covered in "memory-fold" technical fabric that retains a wrinkled appearance. \n\nStage 5: Final Prototyping & Material Finish Textural Replication: Apply a matte, slightly porous finish to the material to mimic the tactile feel of heavy-bond paper. Lighting Contrast: Use directional studio lighting in the final renders to emphasize the "tossed" shadows, making the chair look like a giant piece of discarded inspiration. Design Tip: To keep the "tossed" look authentic, avoid symmetry.
此提示詞的權利屬於作者 @ShamsAmin56。任何商業使用(推廣 AI 工具、聚合平台、Telegram 機器人)由你自行負責,mozgi.io 不承擔任何責任。 詳情 →